DIY Homesteading

A little known trick for really cheap internet service.

Living off grid in the Ozarks there isn’t a cable internet service to get good high speed internet. Most people think the only option is satellite internet service, which isn’t terribly reliable and can get really expensive if you use a lot of band width. I’m writing this article to let people know there is a better way. Well, I’m writing to explain how my wife and I get really cheap internet at streaming speeds in an off grid situation.

We use our phones to get internet access on our laptops and tablet, but we don’t use the phone’s wi-fi hot spot.

Most phones today have wi-fi hot spot capabilities, but phone service providers charge extra for it and it’s not cheap. It can cost $20 to $40 dollars for just a few gigabytes.

The trick that many people don’t know is that it’s possible to simply use your phones Bluetooth to tether your data to other devices. The reason most people don’t know this is because your phone’s capability to create a data connection to another device through Bluetooth tethering has most likely been turned off by your service provider.

Your service provider wants to be able to charge you those crazy expensive hot spot fees. They know they’re not going to be able to get all that extra money if you can just use your phone’s Bluetooth to share your phones data with other devices.

A man pulling money from his wallet to pay a bill.
Photo by Artem Bali

So, in my case, I use ATT monthly prepaid service. In the past I paid $45 per month for unlimited services and this included 8 gigabytes of high speed data. 8 gigabytes would usually last me about 3 weeks , so for the last week of the month I would have super slow data and this didn’t include any hot spot data.

Then I found this amazing trick.

One day while searching through my phone’s settings I ran across this setting called “Bluetooth tethering”. When I looked up what it was I found out that it would bluetooth my data to other devices without the hot spot being active on my phone. This meant I could now use my phone’s data to have internet on my laptop or tablet or any other smart device for that matter.

The problem was no matter what I tried to turn this setting on, my phone just wouldn’t let me. Much research later I read an article claiming that this setting had been locked out by the manufacturer at the request of AT&T. I can’t know the truth about why the setting was locked, but it made sense to me knowing how much extra AT&T charged me for hot spot data.

I finally found the solution and it was so simple and didn’t cost anything.

The answer was a very simple app which I will provide a link to at the bottom of the page. The app only does 1 thing it turns your phones bluetooth tethering on and off. It’s basically just a toggle switch.

It’s absolutely free.

It’s a tiny little app at only 84 KB.

It uses no data.

It doesn’t run in the background.

It requires no permissions.

It doesn’t send you any annoying notifications.

Best of all, it doesn’t have ads.

It is by far the best, most useful app I’ve ever installed on a phone.

So, now I upgraded my AT&T monthly prepaid service to the $65 per month plan. I pay $20 dollars more per month than I use to, but with this plan I get 22 GB of high speed data. To this day I haven’t used 22 GB in a single month, and my wife and I stream TV shows from Prime Video almost every night. Plus, I have to get my YouTube fix almost every morning.

The best part is that I can now use all those GB on my laptop or my tablet. I no longer have to pay $10 for 1 GB of Hotspot service.

Now I should also say some phones don’t have this setting locked out. Check your phone to see before you download the app.

Also if your phone doesn’t have the bluetooth tethering capability then this app won’t work. As far as I know this app is for android users only.

I also want to say I’m not affiliated with this app in any way and make nothing from this recommendation.

The link for this app is

https://play.google.com/store/apps/details?id=jp.co.nicumaru.bluetoothtetheronoff&hl=en_US

If you have any questions please leave them in the comments below.

Let me know if you found this information useful.

​Read More
Moonshine Resources

Why Moonshine Should Be On Every Prepper’s Short List

Introduction

Moonshine is very versatile as a survival and shtf commodity, but where it will really shine in your prepretuare is as a barter item. Preppers often talk about stockpiling things that can be used as barter items, but most things we talk about are one-offs after shtf. Things like toilet paper, diapers, ammo, coffee, and cigarettes to name a few. But whiskey can be made again and again if you know how to do it.

This article isn’t meant to be a how-to. It’s meant to just get you thinking about the usefulness of moonshine in your preparedness plan.

If you’re interested in getting into home-distilling I would suggest listening to the “Still’n The Clear” podcast. It’s a weekly podcast for the beginner moonshiner.

The Still

You have to have a still if you’re going to make moonshine. The good news is a simple still is easy to make, but you need to make it now because salvaging the things you need after shtf might prove to be difficult.

There are many designs on the internet. The size of the still will determine how much whiskey you get from a single still run. The bigger the still the more whiskey per run will be possible, but the bigger it is the more difficult it becomes to transport. I believe theses two variables should be considered when deciding which design to build.

https://youtu.be/QRscYMsMmlc
learn how to make a simple 25 gallon still at home.

The Mash Recipe

As a prep Moonshine will be made from whatever you can get your hands on. There won’t be any fancy recipes or consistency unless you’re able to produce the ingredients you need. Traditionally moonshine is made with grains most notable is corn, but it can be made from anything containing sugar or starch.

Click the image above to get 20 mash recipes for FREE

Even if you can’t produce what you need there will be all kinds of things in the wild that you can use. All the wild edible berries in your area can be used to make moonshine (brandy to be specific). Potatoes, turnip, wild sunchoke, pawpaw, and all the tree fruits can be used.

So, unless you’re just having a hard time finding enough food to eat, there should be plenty use in a batch of mash.

Fermentation

in the modern fermentation process, we use activated yeast and sugar to streamline the process, but you won’t be able to run down to the store to pick these items up. Fermentation will still happen naturally just not as quickly.

In fermentation you have yeast that feeds on the sugars and starches, in turn, the yeast releases alcohol, thus turning sugar into alcohol. This process can be done in 5 to 10 days with activated yeast but will take longer without it. Don’t bother stocking up on activated yeast because it loses its effectiveness rather quickly.

Another plus is that the fruit you find that may have already started to become overripe and mushy is perfect for a batch of mash. That rotten apple at the bottom of a barrel won’t be a problem after all.

The Yeast

The yeast is the easiest ingredient of all. If you pick your fruit outside there will already be natural yeast on the surface of the fruit. Don’t wash it off. This natural yeast will start the fermentation process on it’s own. If you’re really serious about making whiskey as a barter item then you can even propagate your own yeast and have it already activated to speed up the process.

Summary

As stated before, this article is meant to promote the advantage of using moonshine as a barter item. I don’t think a discussion is needed about whether whiskey will be a popular commodity or not. add to that the renewable nature of moonshine and it seems to be a great asset to any prep.

Emergency Foods

The processes involved in making moonshine are more complex than this article allows. If you would like me to do some how-tos about making moonshine with natural sugars and yeast let me know in the comment section at the end of the article.

For really smooth mash recipe click picture below.

​Read More
Micarta Knife Making

How To Make A Knife From A Knife Blank: A Step By Step Tutorial For Beginners.

Introduction

In this tutorial we will make a knife using a Damascus blank with a full tang. The handle scales will be micarta and we’ll pin it with brass pins. This is the simplest way to make a knife and is a great project for the beginner.

Some of the links in this post may be affiliate links. This means offgridmaker.com could earn a small commission, at no additional cost to you, on the things you purchase.

Things you need

Supplies

  • Knife blank
  • Micarta
  • 3/16″ brass pins
  • 100 grit and 220 grit sand paper
  • 2 part epoxy
  • polyurethane

Tools

  • Angle grinder with 60 grit sanding wheel
  • Coping saw for cutting out the micarta
  • Drill with 3/16″ drill bit
  • Clamps

The knife blank

If you don’t have a knife blank don’t worry. Knife blanks aren’t hard to find online. Some really great deals can be found on Amazon and free shipping most of the time. Just one example is below. Click the link below to browse all the different blanks available on Amazon.

https://amzn.to/2YAtomM

Drill holes for the pins

In this tutorial, I’ve chosen to use 2 pins, but you can put as many pins as you want in the tang of the handle. The drill bit should be the same size as the pins that you choose to secure the handle. Some blanks will come with the pinholes already drilled in which case you just need to match your brass pins to the hole size.

The knife blank clamped and a hole for the brass pin being drilled

Trace the shape of the handle onto the micarta.

Lay the blank onto the piece of micarta and trace the shape of the handle then flip the blank over and trace the other side of the handle.

The knife blank laying on the micarta piece and the shape of the handle being traced onto the micarta
Don’t forget to flip the blade over to trace opposite sides.
Thumbnail for the how to make micarta article.
Click the picture above to see the article on making your own micarta.

Cut out the scales

Cut the pieces out of the micarta with the coping saw (or a jig saw). Leave a little extra material around the trace lines to be removed later

Drill holes for the pins

Drill holes for the pins into the micarta. Clamp one side of the scales to the blank. Drill through one of the pinholes and all the way through the micarta. Place a brass pin through the hole so the micarta doesn’t shift. Drill out each hole placing a pin in as you go. Repeat with the other side of micarta.

The knife blank clamped to the micarta cut out so the pin hole can be drilled into the micarta

Pin the micarta scales to the blank

Pin the micarta scales to the blank without using the epoxy and shape the outline of the handle. I use an angle grinder with a sanding disc, but you can use a belt grinder or even sand by hand.

both micarta scales are pinned to the knife blank with brass pins.
The edges of the handle have been shaped with an angle grinder.
I use an angle grinder with a 60 grit sanding disc to do this, but you can use a belt sander or even a hand file.

Shaping the handle scales

Shape the front of the handle scales. To do this you have to remove the handle scales from the knife blank and pin them together. Now the front end of the handle scales can be shaped to match exactly.

Handle scales have been removed from the knife blank and pinned together to shape the front of the scales.
The handle scales pinned together with out the knife blank.

Finish the shaping

Pin the scales back onto the blank and finish shaping the handle. You want to get the rough shape completed before you epoxy the scales to the knife blank permanently.

The rough shape of the handle has been finished.

Attach the handle scales

Epoxy the shaped scales to the blank. Remove the scales from the blank leaving the pins in place.

Handle scales have been removed. brass pins are still in place. the knife blank is ready for the two part epoxy.

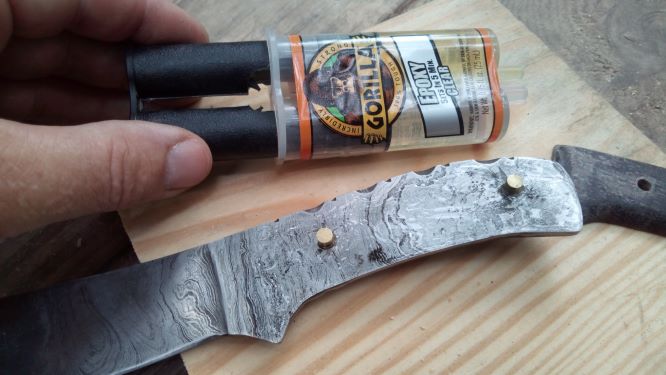
Use the two part gorilla glue to epoxy the scales to the blank.

Handle scales have been removed. brass pins are still in place. the knife blank is ready for the two part epoxy.
Click the picture to get the current price of gorilla epoxy

Now clamp the scales tightly to the blank and let set for the recommended time noted on the epoxy directions.

Handle scales have been epoxied in place and they are clamped tightly to the knife blank.

finish the sanding

Finish any rough shaping with the angle grinder. This will usually be around the pin areas to get them flush with the handle scales.

Do the final sanding by hand with 220 grit sandpaper.

Tape off the blade and seal the handle with Deft exterior grade polyurethane.

Deft brand spray polyurethane
Click the picture above to get the current price for Deft polyurethane
The knife blade is taped off and clamped so the handle is in the air ready to be sprayed.
Use a clamp to hold the knife in place with the handle in the air for hands free spraying.

This will take several coats. Allow to fully cure between each coat. Sand between each coat stepping up to a finer grit each time. When to stop is completely up to you. It depends on how smooth you want the handle to be. The more coats and the higher grit used in the sanding the smoother the handle will be. I do recommend at least three coats.

The knife is finished
a close up of the micarta knife handle.

If you’d like to take a deeper dive into how to make a knife with simple tools check out this book.

Just click the image below to get current prices on Amazon

​Read More
a simple micarta press made from 5 pieces of scrap lumber
Micarta Knife Making

How to make a simple but effective micarta press

Making a micarta press is easy, nearly free and can be done in just an hour or two. It takes just 2 pieces of scrap lumber cut into 5 smaller pieces, some wood glue and some screws to make a press that can be used to make countless number of micarta blanks.

Some of the links in this post may be affiliate links. This means offgridmaker.com could earn a small commission, at no additional cost to you, on the things you purchase.

The 5 pieces of wood needed to make a micarta press

What’s Needed

Tools

wood saw

Screw gun

tape measure

speed square(optional)

Marker or pencil

Materials

1 x 8 16″ long

2 x 4 8″ long

Wood glue

6 – 1 1/2″ screws

The Pieces

Step 1

Mark out pieces A thru D on a piece of 1 x 8 x 16″ as shown in the picture below.

Step 2

Cut out the pieces in the above picture.

Step 3

Cut a 2 x 4 8″ long. Now we have all the pieces. Label them A thru E as Pictured.

Pieces A thru D should be cut out of 1×8 material(3/4″ thick). E should be cut from 2×4 material(1 1/2″ thick).

Assembly

The cradle

Place piece E on a flat surface and put C and D on edge at the sides of E. Lay a bead of wood glue on the top edges of C and D. The two side pieces C and D should be about 7/8″ higher than the 2 x 4(E).

Don’t allow much of a gap between the 3 pieces. This will form the channel known as the cradle.

Now place piece A on top of the side pieces to form a sort of table over the 2 x 4 and screw the top to the side pieces allowing the 2 x 4 to move freely.

Set the cradle to the side now and add glue to the top of the 2 x 4(E).

Place piece B on top of the 2 x 4. The pieces should be flush length wise and the sides of piece B should overlap both sides of the 2 x 4 approximately 7/8″.

Now you should have 2 separate pieces. The press should fit nicely into the cradle. There should also be a gap between the 2 x 4 of the press and the bottom board of the cradle.

the cradle on the left and the press on the right,
In this picture you can see the gap we’ve created. If all worked out yours should have a gap of about 3/8″. This gap will determine the final thickness of the micarta.

If you made it this far please leave a comment at the bottom of the page to let me know if you liked this article and how I can improve it.

If you would like to see the article describing the step by step process for making micarta with this type of press click the picture below.

Now that you have a micarta press LET’S MAKE SOME MICARTA!
​Read More