Casinos That Accept Bank Transfer: The casino has landed fully loaded with games from a long list of top tier developers, so straight away you can dive right in and start playing your favourite pokies as well as immersive live casino games.
How to play slot machines and win in Sydney crypto casinos
Most of us are now under some version of a lock-down or quarantine, whether forced or self-imposed. As homesteaders, off-gridders or preppers we should take this opportunity to hone our skills or learn new ones.
Some of the links in this post may be affiliate links. This means offgridmaker.com could earn a small commission, at no additional cost to you, on the things you purchase.
Contents
mindset matters
decide and do
learn new skills
practice existing skills
Mindset Matters
In times like these when things are uncertain, there can be a lot of anxiety around what could happen. It can be hard not to worry about the what if’s.
There is a good way to combat these
feelings. It just takes two steps
First, identify the things you can’t do anything about. Most of the anxiety we feel is based around things we have absolutely no control over. Giving our energy to these emotions has no effect on the outcomes of things we can’t control.
It’s impossible to not have thoughts about these things that worry us which are outside our control, but when we have them it is critical to acknowledge them as something we can’t control and move on to step two.
Step two is simply making a plan of action to do something we can control. Consciously making a plan of action helps to relieve stress around the uncontrollable things by giving us a sense of control and by occupying our mind with actionable exercise.
Decide and Do
Now that we’ve decided not to borrow worry from the future, it’s time to decide what to do and do it. Deciding what to do is obviously up to you but I’m writing this article to make a couple of suggestions. I think this is a great opportunity to either learn new skills or hone the ones we have.
I’m an off-grid homesteader and there are always things I want to learn or things I want to get better at but there never seems to be enough time to get around to those things. Well now most of us are stuck in a situation where we have more time than we’ve had in a long time.
We can use this time to focus on these
new skills and as a bonus set aside, at least somewhat, those worries
we’re all having about this pandemic.
Learn new skills
If you’ve been planning on going off the grid this is the perfect time to start learning and practicing those skills that are going to get you there. Who knows how long we have before we have to get back to the daily grind that takes so much of our time. Today is the time to choose something to learn and do it.
Read a book about the skills you want. There are books out there about anything you want to learn. The great thing is you can start reading a digital book today. You don’t have to go to the library or the bookstore and you don’t even have to wait for it to be delivered. Pick a subject and download a book today.
You can also get an audiobook to listen to while you do other things like clean out that attic. I know you’ve been looking forward to that.
The best part about this plan is Amazon is offering a free trial with there Kindle membership. It gives you unlimited access to millions of e-books you can read on any device and audiobooks you can listen to. All at no cost for a limited time. Here are some links that describe the program. https://amzn.to/2RgXvLo
Also, you can check out my recommended books page where I list some really great books about survival first aid, foraging, bushcraft, DIY solar, rainwater harvesting, the off-grid lifestyle and more.. https://offgridmaker.com/recommended-books/
Learn a new skill by watching YouTube
videos or listening to podcasts. These approaches are safe in this
time of social distancing and don’t require any money. So let’s get
to it and learn something new while we have the time to do it.
Practice our skills
We all know that we can’t just read
about skills or listen to someone teaching us skills and expect to
know how to do the skill. We have to get out there and practice.
This reminds me of when I was in Boy
Scouts as a kid. We earned merit badges and these were basically
awards we earned when we learned a new skill and demonstrated to our
Scout Master that we had learned the skill and were proficient at the
skill. This took practice. We didn’t just read about it and get the
merit badge. It required practice to learn it.
Learning new skills has value we can’t even quantify because we have no idea how many times that new skill is going to come in handy throughout our lives.
One of the greatest points to learning
a new skill or perfecting an existing one at this particular time is
that the process of doing it has taken our mind off these worrisome
times, even if only for a little while.
I hope you have found value in this
post and I would love to hear your comments and suggestions, so don’t
be shy. Let’s see how many great ideas we can all come up with
together.
The inverter’s main job is to convert the DC electricity from the battery bank into AC electricity to be used by standard household appliances.
Solar panels convert sunlight into
DC(Direct Current) electricity. This electricity is then stored in a
battery or bank of batteries. Because most electronic devices and
appliances run on AC(Alternating Current) electricity they can’t be
powered by the battery bank directly. The DC electricity must be
converted into AC electricity.
Some of the links in this post may be affiliate links. This means offgridmaker.com could earn a small commission, at no additional cost to you, on the things you purchase.
There are mainly two types of inverters. These inverters come in many different sizes.
Modified sine wave inverters produce electricity that is “dirty” or “choppy”. These inverters will work fine for simple electronic devices but will cause problems for more complex devices like modern TVs, computers and smart controlled appliances. These inverters can save you hundreds in the cost of your solar system but maybe a bad choice depending on the complexity of your electronic devices.
Pure sine inverters produce a “clean” electrical current equal to or better than what is produced by utility companies. If you plan to use complicated electrical devices or appliances then a pure sine inverter is a must for you. It will cost more initially but will save you money down the road if you have to replace appliances because you used a modified sine wave inverter.
Inverters are sized by the wattage they are designed to handle. Inverters can be as small as 100 watts that you can plug into the power outlet in a car and they can get into the thousands of watts that are hard-wired into your home solar system and all sizes in between.
Wattage is determined by voltage and amperage. Volts x Amps = Watts.
To choose the right size inverter you need to find out the max amount of amps your whole electrical system could possibly use at any given moment. If you are tying your system into a standard breaker box you can simply add together the amp rating on all the individual circuit breakers. This will give you the maximum possible amps in that system, but it will also most likely be extreme overkill.
To get a more accurate idea of the
actual maximum you need to look at each individual appliance and
device that will be plugged into the system. There will be an amp
rating labeled on the appliance somewhere on an electric UL listing.
Add together all the amp ratings from
all the appliances. Multiply the sum by 110v (United States). This
will give you the total watts of the system.
Example: 130 amps x 110 volts =
14,300 watts
The number of watts will tell you what
size inverter to get.
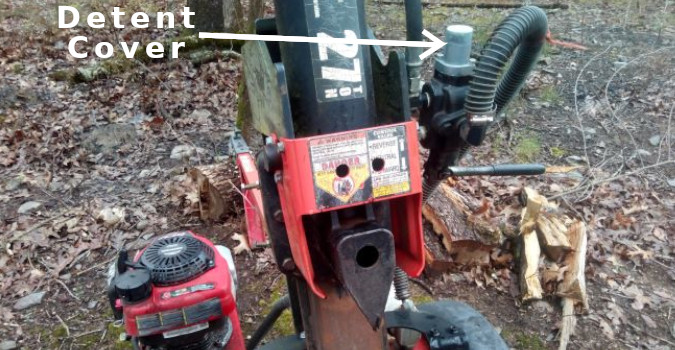
Fixing the auto-return on a hydraulic control valve usually is just a matter of tightening The bolt inside the detent cover assembly. This tutorial apply to the Energy control valve. This valve is the most prevalent valve used in the residential log splitter industry.
The detent cover on the hydraulic valve controls the auto-return
Some of the links in this post may be affiliate links. This means offgridmaker.com could earn a small commission, at no additional cost to you, on the things you purchase.
Contents
What does the detent on a hydraulic control valve do?
How to adjust the detent.
How to replace the detent.
Where to buy a replacement detent part.
What does a detent on a hydraulic valve do?
The detent on a hydraulic valve controls automatic return features. For example, on a log splitter, it allows for the auto return of the hydraulic piston. This allows you to get the next log to be split ready while the piston is returning to the start position. If the detent isn’t working correctly you will have to hold the hydraulic control lever in the return position until the cylinder gets back to the start position. This is inconvenient and can nearly double the time it takes to split wood if you’re working alone.
How to adjust the detent.
To adjust the detent you must first remove the detent cover. It is held in place by 2 hex bolts.
The 2 hex bolts hold the detent cover in place
Once the detent cover is removed you’ll be able to access the detent assembly. At the top of the assembly, you can see a slotted cylinder. This is the adjustment bolt for the detent.
In this picture, the bearing at the top center of the slotted cylinder is missing. You will see a bearing when you remove the detent cover.
When you tighten this bolt the detent will hold the control valve lever in the return position more tightly. When you loosen this bolt the detent will hold the lever in position less tightly until it won’t hold it at all.
If you control lever won’t hold into the automatic return position 9 times out of 10 you just need to snug this bolt down with a couple 1/4 turns.
Replace the detent cover and give it a try. You are more than likely all fixed up at this point.
If tightening this bolt down doesn’ fix the problem then you’ll need to replace the detent and detent cover altogether. This is also very simple.
How to replace the detent
Here is a link to find the replacement detent and current prices on Amazon. https://amzn.to/2J7TeFg
Once again, you need to remove the detent cover. Then unscrew the adjustment bolt all the way. this will remove the detent assembly from the hydraulic control valve.
Be sure to wipe away all oil and debris from the detent base before installing the new detent. DO NOT use a scraper or anything that can gouge the base. This could cause a hydraulic leak.
When the new detent arrives it will be shipped with the detent assembly already assembled and set inside the new detent cover.
Detent cover assembly shipped preassembled.
The detent assembly will have to be removed from the detent cover.
CAUTION: Do this very carefully. When sliding the detent assembly out of the detent cover don’t allow the assembly to come apart. There are small bearings inside the detent assembly that are held in place by the detent sleeve
DO NOT allow the detent sleeve to slide up and out of place.
Thread the detent into the base threads of the control valve. Tighten it down all the way by hand making sure not to allow the threads to get crossed. Once in place snug down the assembly with a large slotted screwdriver.
New detent assembly installed. Pack the top bearing with grease if it wasn’t greased by the manufacture.
Now it’s time to screw on the new detent cover and try it out.
You may need to tighten down the slotted sleeve more if it isn’t holding the control lever into the return position.
Use the comment section below if you have any questions. I respond daily to comments.
A 600-watt solar system is a small system, but it can be a great place to start. Going off-grid is a journey and you have to start somewhere. This system can cost between $1,500 and $2,000 if you do the install yourself. This article will show you just how to do that.
Some of the links in this post may be affiliate links. This means offgridmaker.com could earn a small commission, at no additional cost to you, on the things you purchase.
Contents
What situation this set-up is for.
How difficult will this be?
Materials Needed
Tools Needed
Step by step process
Step 1: Build a rack system for the solar panels
Step 2: Connect the solar panels in parallel
Step 3: Decide where to store battery bank, charge controller and inverter
Step 4: Install batteries and wire in parallel
Step 5: Mount charge controller and inverter
Step 6: Connect battery bank to charge controller
Step 7: Connect solar array to charge controller
Step 8: Connect Inverter to existing A/C breaker box
Step 9: Connect battery bank to the inverter
Summary
Resources (direct links to all the parts used in this article)
What situation this
set-up is for
The exact situation for this project is retrofitting solar to an old mobile home that was originally set up for A/C power connected to a public utility grid.
Here is an easy Solar System Calculator for you to figure out how large your solar system needs to be.
One of my neighbors who lives up on the mountain near us lost their home to fire. They lost everything in the fire but had an old abandoned mobile home on their property. They decided to move into it, but it had no electricity.
They asked me if I could install a
solar system on the mobile home and told me they had a budget to buy
materials of $2,000.
This article is the result of that project. To be clear, this set-up is not the ideal set-up to do solar, but it is what I came up with to fit their budget and to utilize the existing mobile home.
A very large part of living off-grid is
making compromises between what is ideal and what you have to work
with, so I thought this would make a great article for
Offgridmaker.com.
One very
important note: This set-up WILL NOT WORK, if your structure is
hooked to the electric grid. If you try to hook a system up like this
to a structure currently connected to the power grid you will damage
the electrical components of the system.
How difficult will this
be?
This project isn’t difficult if you follow along with this step -by step tutorial. I’ll rate this project on a 1 thru 10 scale based on skills you may have. 1 is so easy you can do it in your sleep 10 being you should get professional help.
If you’re an electrician or work in the electrical field, this project will be a 2.
If you’re handy with tools, but don’t have electrical experience, this project will be a 4.
If you have little to no experience with tools, this project will be a 6.
If you have no tool experience and you don’t know what a circuit breaker is, this project is a 10.
If you would like to take a deeper dive into the basics of solar so you can understand why not just how I recommend the book below. Click the image for the current price and availability on Amazon.
Materials
6 – 100-watt solar panels
1 – 1500 watt pure sine wave inverter
1 – 40 amp PWM charge controller
3 – 110 amp/hour 12v deep cycle solar AGM batteries
4 – battery connector cables
2 pair– 3 to 1 Y MC4 connectors
1 pair – 2 to 1 Y MC4 connector
12 ga copper stranded wire rated for exterior use (length depends on your own projects)
6 – 3/8” washers
mounting screws (type and size dependent on your application)
6 sets of solar panel mounting brackets
Tools
Screw gun/screwdriver
10mm wrench or socket
#2 Philips head screwdriver
wire strippers
Step by Step process
Step 1: Build a rack
system for the solar panels
I
highly recommend having your solar panels attached to a rack of some
kind. This allows for more accurate alignment with the sun and makes
it less likely the solar panels will be damaged.
That being said, you can temporarily lay the panels on the ground or lean them against a structure to save the cost of a solar panel rack system. This article is about the wiring and connection of a basic solar system so I haven’t included any instructions about the solar panel rack.
I have written a separate article about how to build a solar panel rack for free.
Step 2: Connect the
solar panels in parallel
Whether
you have installed your solar panels on a rack or not you have to
wire the panels in parallel.
Simply put, this means you will connect all the positive wires together and all the negative wires together. Since we have used 6 solar panels the easiest way to do this is to Connect 3 panels together with the 3 to 1 Y MC4 connectors.
After this is done you should have 2 sets of 3 panels. Now connect the 2 sets of panels together together with the 2 to 1 Y MC4 connectors.
You should now only have 1 pair of wires (1 positive and 1 negative) coming from the panels and ready to run to the charge controller.
Step 3: Decide where to
store battery bank, charge controller and inverter
Now you must decide where to install all the components for the system. Ideally, you want all the components installed as close to each other as possible and as close to the solar panels and the existing breaker box as possible.
This does two things. It allows for the purchase of less cable lowering the cost of the project and it creates a system with less efficiency loss which means getting more out of the system.
Ideally, you want your components in a closed area like a closet that you can vent later as the system gets larger, but in a location that is easily accessible.
Because
the distances between components are going to be different on your
project than it is in this project you will want to check gauges for
wiring to make sure you use the correct gauge wires. If the distances
from your solar panels to your batteries is less than 30 ft. then you
can use the gauges set forth in this tutorial.
There
are different ways to configure a battery bank. For this system we
want our battery bank to produce 12 volts. This means connecting the
batteries together in a parallel configuration.
notice the black battery cables are connecting all positive posts together and all negative posts together.
You
will connect all the positive posts together and all the negative
posts together.
For this, you will use the battery connector cables which are heavy gauge and short. This is where you will use the washers. The cable ends will attach to the battery with a washer and battery post bolt. Different types of batteries use different methods for battery post connection, but if you purchased your batteries through the links provided in this article then you can just follow the pictures provided. If you have purchased different style batteries then the main thing is to make sure the batteries are connected in a parallel configuration.
Step 5: Mount charge
controller and inverter
Notice the 1x4s on the wall that the inverter is mounted to.
Now it’s time to mount the charge controller and the inverter. You want them mounted as close to the battery bank and the A/C breaker box as possible while also in a place that can be easily accessed because from time to time you will need to check on the status of the system by looking at the display on the charge controller.
The charge controller is very small and light so it can be easily secured with small screws into wall paneling or using sheetrock anchors if needed.
The inverter is large and heavy so, it will need to be mounted with more attention to stability. In this project, you can see I attached 2 1x4s to the studs of the closet wall and attached the inverter to the 1x4s. The inverter has receptacles and the on/off button on one end, so be sure to install the inverter with that end up for ease of access.
Step 6: Connect battery
bank to charge controller
Now you can start connecting all your components together. It is best under most circumstances to connect the battery bank to the charge controller before you connect the solar array to the charge controller, but if you are following this tutorial and have purchased your charge controller through the resource links provided at the end of this article then be sure to connect the battery bank first.
You
can connect the battery bank to the charge controller using leftover
wire from the solar panel connection cables or you can use a section
of an old extension cord. Just make sure the wire you use is at least
12 gauge copper stranded wire. There is a section on the bottom of
the charge controller where you make all the necessary connections.
There is an icon over each set of connections to let you know what to
connect where. You will connect the battery bank to the set of
connections indicated by an icon of a battery using one wire for both
the positive connection and the negative connection. You only need to
connect to one of the batteries in the battery because they are
connected together in parallel.
Step 7: Connect solar
array to charge controller
It’s time now to connect the solar array to the charge controller. You should have one pair of wires coming into the structure from the solar panel array outside. These wires will connect to the charge controller connections indicated by an icon of a solar panel. Make sure that positive goes to positive and negative to negative. Bringing the solar array wires into the structure can be done in several different ways; through the wall, roof or floor. Just make sure however you choose to make the penetration in the structure that it’s watertight and doesn’t allow for rain to get into the structure.
Step 8: Connect
Inverter to existing A/C breaker box
With the battery bank now connected to the charge controller, you can connect the inverter to the A/C breaker box of the structure.
I
want to stress again that you can not connect the inverter to an A/C
breaker box in this fashion. If the A/C breaker
box is connected to an electric utility provider. It can damage or
ruin your new solar equipment and it can be very dangerous to you.
Make sure the existing breaker box isn’t connected to the utility
provider.
If you
aren’t sure about this then go no further with this project until you
are.
At this point in the system the highest amps will potentially be running, so use the heaviest wire you can. Anything above 8 gauge won’t be necessary on this exact set-up. At one end of the wire, you will need a male receptacle plug the other end will hardwire directly to the input side of the A/C breaker box.
The end with the plug will plug directly into one of the 3 outlets on the inverter. On the other end, you will connect the black wire one pole of the main shut-off breaker in the breaker box. Connect the common wire (white wire) to the common wire bus in the breaker box. The common bus will be on the side of the breaker box and will have several other white wires connected to it. The bare wire, also known as the ground, will be connected to the other bus in the breaker box with other ground wires connected to it.
Step 9: Connect battery bank to the inverter
The
last connection to be made is connecting the battery bank to the
inverter. If you used the links provided in this article to purchase
your components then the inverter you purchased will have the cables
needed to connect the inverter to the battery included. Connect the
red cable to the positive post on one of the batteries and to the red
post on the bottom of the inverter. Install the black cable to the
negative post of the same battery and to the black post on the bottom
of the inverter.
Congratulations,
You have now installed a 600watt solar system.
Finally. You will need to plug the remote power switch into the inverter. This power switch has a long cable so you can run it to a convenient place to quickly be able to shut down the inverter which will separate the flow of power from the battery bank to the inverter.
Since we have only run power to one leg of the breaker box only half of the circuits in the breaker box will have power. You can use only these circuits or you can duplicate step 8 and connect it to the other leg of the breaker box. This will allow the use of all the circuits in the breaker box, but it will also increase inefficiency through increased loss due to resistance.
Summary
This system is a barebone type of system meant to get power going with 600 watts of power and a budget under $2000. There are different downfalls to this system that can be improved with a higher budget and would be recommended if a higher budget is possible. Contact me through the contacts if you have questions about what I would change if more money to purchase components where available.
This system is also designed to connect to an A/C breaker box to supply power to a structure. This is a less efficient way to supply power than a D/C system, but there are several different reasons to do it this way. Contact me through the contacts if you have any questions.