Off grid diy siding. low cost , high quality, long lasting
DIY Homesteading

How to Mill Log Siding Without a Sawmill

Choosing an exterior siding for our cabin has been quite a challenge. The main reason for this is the high cost of quality siding. The affordable siding on the market is really low quality and we just didn’t want to use it for that reason, plus we really wanted a rustic look for our homemade cabin.

Some of the links in this post may be affiliate links. This means offgridmaker.com could earn a small commission, at no additional cost to you, on the things you purchase.

What we have found is perfect. It will last a long time. It’s very cheap (around $0.16 per square foot). We can’t be any happier with the solution we found.

We have found a way to mill out our own log siding out of the leftover slabs from the local sawmill. The only tools used for this is a circular saw, chalk line, tape measure and a saw guide.

The saw mill bundles up the slabs left over from the milling process. These bundles are just small enough to fit in the back of a pickup. Our saw mill charges us $20 for the bundle and from that bundle we’ll be able to make around 120 sq. ft. of log siding. $0.16 per sq. ft. is extremely cheap for real wood siding. The down side is the time and effort is pretty heavy.

This is the bundle of slabs at the sawmill

The first thing about siding that’s important is it’s ability to shed water away from the structure and not allow water to migrate from the exterior to the interior. For this reason I cut the edges of the siding to have a slight angle or pitch down and away from the wall.

A close up view of the edge of the log homemade log siding. It shows the down and away pitch of the angle that I cut into the dege.
Here you can see the pitch of the edges of the log siding. It slopes down and away from the wall allowing water to shed away from the cabin.

As it turns out the process for achieving this is much simpler than it seemed to me at first.

The other thing to consider with the use of the sawmill slabs is that they aren’t uniform in any way. They aren’t the same thickness or width. Most of the pieces don’t even have a straight edge. This is where the time and effort come in to play.

Step 1

The first thing I did was separate the slabs from the bundle into different piles.

The first pile were the pieces that I could easily mill because they already had at least one straight edge and the width would make a piece of siding which was 5 1/2” wide.

This was the low hanging fruit. These were the pieces which were easiest to make siding from and would take the least amount of energy and time.

The second pile were the pieces I could still mill into siding, but it would take more time because none of the pieces had a straight edge already. This added an extra step; snapping a chalk line for the first straight edge. This stack also included pieces that would still make siding, but the pieces would be less than 5 ½” wide.

The third pile was material in the bundle that was actually 1 x 6 or 1 x 2 or some sort of dimensionally milled lumber that got culled by the people at the saw mill for one reason or another.

The forth pile included pieces that I couldn’t make siding from but could still be used in constructing other projects where technical specifics wouldn’t be quite as important. Most of that material will end up being a wood shed. “How to build a simple wood shed” coming soon.

The fifth pile was material that really wasn’t good for any type of construction material. I will chop and split all this material up into pieces to burn in my homemade wood fired water heater. I might not be able to build anything with it, but I can turn it into hot water.

Step 2

Now we need to have some saw horses or something to mill all this side on. I found the regular saw horses to be a bit inadequate because the slabs have a tendency to ship and move around doe to their irregular shapes and edges.

I took some scrap lumber and pieces from the sawmill bundle to build some saw horses specific to this use. For now I will include some pictures and may in the future write a separate article on how to build them if I receive enough of a response to do so.

Here you can see the legs extend over the top of the saw horse and are cut at a sharp angle. This allows the irregular shapes of the slabs to set on the saw horses without moving around too much.

Step 3

We need to set up the saw for our cuts.

First we should set the angle. I set the angle at 10 degrees. This should be just enough angle to allow any water to be shed away from the wall and not allow it to run up and behind the siding. This angle is up to you.

Now we need to set the saw guide.

A picture of the new saw guide attached to my porter cable circular saw
This is a great saw guide. It has a thumb adjustment which is used dial in the a perfect adjustment. It also comes with different sized arms to fit a multitude of saw brands.

Chttps://amzn.to/2H1n5P6 lick on the picture above for the Amazon link to this saw guide.

Setting the saw guide makes it possible to cut all the siding to a uniform width, and to make the cut straight and quick.

I found the guides that typically come with the circular saws aren’t long enough to mill a piece of siding wider than about 3”.

Since most of my siding is 5 1/2” wide I had to purchase a saw guide that would be long enough. I found a great universal guide that will work with many different makes and models of circular saws. This way if I get a new saw it’s very likely that the guide I have will still work.

When setting up my guide I decided I would only mill two different widths of siding. This meant I marked two different points on my guide. One at 5 1/2” and the other at 4 1/2”. This allows a quick change from one width to another without the use of a tape measure each time.

Step 4

Now it’s time to start making cuts.

I started with the pieces that already had a straight edge on one side. Set the slab on the saw horses with the straight edge to right side. The first cut will be along this straight edge. You’re just going to eyeball this cut and allow the angled edge of the saw blade to just ride along the straight edge of the slab.
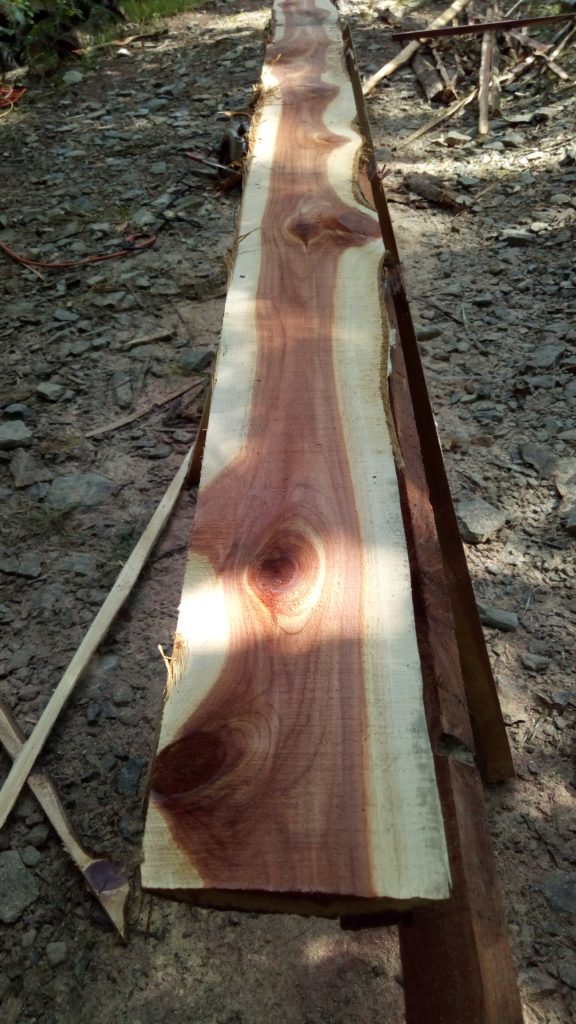
This picture shows a slab on the saw horses ready to be milled.

Now move back to make the second cut. This time allow the saw guide to ride along the edge you just cut.

The saw guide allows for a accurate second cut that takes very little time and effort.

After the second cut I will cut off any bad parts of the ends of the slab that need to be removed. Now you can stack this piece. It’s done. Pretty simple right.

Now for the slabs that don’t have one straight edge already. This just adds one more step. You’ll need to take your chalk line and snap a line near the edge of the slab. Now this line becomes the first cut in this step. That’s all there is to it.

Now find a place to stack your siding neatly so it’s ready when you are.

Summary

So, it took me about 6 hours to mill out 120 sq. ft of cedar log siding. This time includes about 2 hours of figuring and contemplating. Now that I’ve milled quite a bit of siding I should be able to mill out about 100 sq. ft. every 2 hours. With the help of another person I could probably cut that time in half.

Personally, I think this is a great off grid construction technique. It upcycles locale byproduct materials and if you have your own sawmill there will be nearly no additional cost to make the siding.

I would love to hear what you think in the comments.

How would you improve this process?

Would you like a more detailed article about the saw horses?

Have you tried using log slabs for siding?

​Read More
DIY Homesteading

A little known trick for really cheap internet service.

Living off grid in the Ozarks there isn’t a cable internet service to get good high speed internet. Most people think the only option is satellite internet service, which isn’t terribly reliable and can get really expensive if you use a lot of band width. I’m writing this article to let people know there is a better way. Well, I’m writing to explain how my wife and I get really cheap internet at streaming speeds in an off grid situation.

We use our phones to get internet access on our laptops and tablet, but we don’t use the phone’s wi-fi hot spot.

Most phones today have wi-fi hot spot capabilities, but phone service providers charge extra for it and it’s not cheap. It can cost $20 to $40 dollars for just a few gigabytes.

The trick that many people don’t know is that it’s possible to simply use your phones Bluetooth to tether your data to other devices. The reason most people don’t know this is because your phone’s capability to create a data connection to another device through Bluetooth tethering has most likely been turned off by your service provider.

Your service provider wants to be able to charge you those crazy expensive hot spot fees. They know they’re not going to be able to get all that extra money if you can just use your phone’s Bluetooth to share your phones data with other devices.

A man pulling money from his wallet to pay a bill.
Photo by Artem Bali

So, in my case, I use ATT monthly prepaid service. In the past I paid $45 per month for unlimited services and this included 8 gigabytes of high speed data. 8 gigabytes would usually last me about 3 weeks , so for the last week of the month I would have super slow data and this didn’t include any hot spot data.

Then I found this amazing trick.

One day while searching through my phone’s settings I ran across this setting called “Bluetooth tethering”. When I looked up what it was I found out that it would bluetooth my data to other devices without the hot spot being active on my phone. This meant I could now use my phone’s data to have internet on my laptop or tablet or any other smart device for that matter.

The problem was no matter what I tried to turn this setting on, my phone just wouldn’t let me. Much research later I read an article claiming that this setting had been locked out by the manufacturer at the request of AT&T. I can’t know the truth about why the setting was locked, but it made sense to me knowing how much extra AT&T charged me for hot spot data.

I finally found the solution and it was so simple and didn’t cost anything.

The answer was a very simple app which I will provide a link to at the bottom of the page. The app only does 1 thing it turns your phones bluetooth tethering on and off. It’s basically just a toggle switch.

It’s absolutely free.

It’s a tiny little app at only 84 KB.

It uses no data.

It doesn’t run in the background.

It requires no permissions.

It doesn’t send you any annoying notifications.

Best of all, it doesn’t have ads.

It is by far the best, most useful app I’ve ever installed on a phone.

So, now I upgraded my AT&T monthly prepaid service to the $65 per month plan. I pay $20 dollars more per month than I use to, but with this plan I get 22 GB of high speed data. To this day I haven’t used 22 GB in a single month, and my wife and I stream TV shows from Prime Video almost every night. Plus, I have to get my YouTube fix almost every morning.

The best part is that I can now use all those GB on my laptop or my tablet. I no longer have to pay $10 for 1 GB of Hotspot service.

Now I should also say some phones don’t have this setting locked out. Check your phone to see before you download the app.

Also if your phone doesn’t have the bluetooth tethering capability then this app won’t work. As far as I know this app is for android users only.

I also want to say I’m not affiliated with this app in any way and make nothing from this recommendation.

The link for this app is

https://play.google.com/store/apps/details?id=jp.co.nicumaru.bluetoothtetheronoff&hl=en_US

If you have any questions please leave them in the comments below.

Let me know if you found this information useful.

​Read More
DIY Homesteading

How to get free materials for building projects

Today’s post is about how and where you can get FREE or heavily discounted building materials. So, read on and learn how to make your project dollars go further. 

Almost all the projects I want to tackle here on the off-grid homestead require building materials. These materials can get really expensive and at some point, can make a project cost prohibitive. We’ve built every structure on our property from free or very cheap materials.  

Some of the links in this post may be affiliate links. This means offgridmaker.com could earn a small commission, at no additional cost to you, on the things you purchase.

The up-side and the down-side to salvaging building materials 

The up-side is kind of obvious, right, It’s the money. The amount of money saved by salvaging material is crazy. I’ve built so many things from free material, some of them cost absolutely nothing. The picture below is our hen house and chicken yard. I built it for absolutely nothing. 

The hen house and chicken fence built from cedar slabs that were sourced for free from a local sawmill
The slabs used to build the hen house and the fence were salvaged from a local sawmill for free.

You can also feel better about using materials that where likely on their way to a landfill somewhere. Lumber especially, is so costly to us environmentally and so much of it ends up in a landfill. 

The cabin we live in is a Gambrel style 14’ x 18’ cabin with a loft. We have running water with full kitchen, bathtub, washing machine, 8 windows, a tin roof, a small solar set up for lights and phone charging, carpet and tile. All of this we built ourselves and we don’t have $1,500.00 in it yet.  

And now we get to the down-side. When building a project with salvaged materials it is going to take longer. It takes time to locate and gather the right type and amount of materials for any project. The larger the project the longer it will take. It has taken us 5 years to get our cabin this far and it isn’t finished. It took 3 years to get it dried in so we could move out of our 7’ x 9’ shed. Yes, we lived in a shed, but when it’s all said and done, we will have an off-grid cabin in the woods free and clear with full equity.  

When you salvage certain items that are harder to find or have specific dimension sizes that need to be met, like doors and windows, you may not be able to find a specific style or type. You may have to accept a style or type that isn’t your first choice. We have three different styles of windows in our cabin. They’re all white in color, but they don’t exactly match. 

Now let’s get into the reason you probably clicked here. 

Free material sources 

Residential construction sites 

My all-time favorite place to get completely free building materials is new construction sites. For one thing, you can get so many different types of material from one location. You can get framing lumber, siding, roofing, brick, stone, sheetrock, insulation, trim wood, paint, nails, plywood, etc.   

When I go to town, I will take different routes just to make sure I don’t miss a new home being built somewhere. Ideally, I like to find a home addition being built. Many houses being built in one location at the same time can be like winning a lottery.  

I once roofed a 10’ x 16’ shed with asphalt shingles I had picked up 1 at a time around new houses that had just been roofed. I got them from a single housing addition where every house had to have the same shingle per housing covenants. 

 When a roofer is on a house and a shingle slides down the roof to the ground the roofer is not going to waste his time retrieving it. From the ground it will end up in the landfill unless you put it to good use.  

One thing to keep in mind is custom homes (homes sold before they’re built) are typically not as fruitful as speculative homes (homes built in the hopes they will sell in the future). Custom homes already have an owner who may want to save all the same materials you want to get. Either way, remember to always get permission to remove anything from a construction site. Even taking things from a dumpster without permission can be considered theft. 

Commercial construction sites 

Commercial construction sites are basically like new home sites except the types of materials you will be able to get will be more varied and it will be harder to predict what you might be able to salvage without stopping to check. 

 It will be a bit tougher to get permission on a commercial site for two reasons. One, the general contractor may have very strict insurance policies regarding people other than authorized personnel being on the site. Two, these sites are more frequently hit by thieves and so there is a higher level of paranoia about letting strangers have any kind of access. 

Remodeling companies 

A trailer of lumber salvaged from a roof rebuild. 2 x 6 x 14 dimensional lumber plus more
A load of lumber I got from roof repair.
It had about 12 14′ 2 x 6’s

Large scale remodeling companies are a great place to get used fixtures. These companies are taking out plumbing fixtures, electrical fixtures, cabinets, appliances on a regular basis. Sometimes these items are too old to have much good life left in them, but sometimes they may only be a couple years old. Companies that specialize in kitchen and bath remodels will have lots of fixtures they will be happy to let you reclaim. 

The best way to get in with these companies is to call their office number and ask to speak with their site superintendent. Ask if there are any demolition projects going on where you could salvage some usable fixtures. It’s good if you can tell them specifically what you’re looking for.  

Door, window and siding companies 

Door, window and siding companies always have used doors and windows piling up at their shop. Again, some of these items won’t be in great shape, but some will be hardly used.  

Fence companies 

Fence companies always have the problem of hauling away old privacy fence their replacing. Most of them will be happy to let you haul it away. Sometimes they will sell used privacy fence panels really cheap if they’ve already hauled them away from the job site. 

If you can agree to be on the job site on a certain day to haul away a fence that’s coming down, they’ll let you have it for free to save them the labor of hauling it back to their shop. 

This material can be used for all kinds of things from furniture to bird houses. If a rustic theme is something you like then you can use this material for finish products like trim wood, cabinets, walls and ceilings. 

 How to ask for free materials 

When approaching general contractors or company owners you should introduce yourself. Tell them where you live. This tells them you’re local, you’re a neighbor. Describe the project you’re wanting to complete. This can peak a person’s interest and in some cases a contractor familiar with the build process may suggest to you something other than what you’ve asked for that they are willing to let you have. Don’t be long winded with this. Get to the point and leave out unnecessary details. Be prompt about hauling things away. Always be very thankful and express your gratitude. You may want to ask for something else in the future. 

How NOT to source free materials 

Most of the free material you are likely to find will be waste material from new construction or remodeling sites. It’s usually obvious that this material is going to be thrown away. It will be piled up like a big trash pile or it will be in a dumpster. This material isn’t free game. It is still the property of the property owner or the contractor doing the work. If you’re seen taking waste material from the site you will most likely be asked to leave and possibly have the police called on you.  

If, on the other hand, you take down the phone number on the contractors sign that is almost always posted on the construction site and call to ask for permission, it’s likely you will be granted permission to take what you want. 

Contractors continuously fight theft on their job sites. They will jump very quickly to the conclusion that you’re there to steal something if you haven’t asked for permission. So, even if it’s obvious something is going to be thrown away you should still ask for permission to take it. 

Big box stores 

Big box home improvement stores always end up with damaged or defective goods they will usually discount these items pretty heavily. I’m sure all these stores handle this differently. For example, My local home improvement store sells their busted bags of concrete to me for .50c each. They even give me heavy duty plastic bags to put the broken bags in. 

busted cement bags and sand bags for sale for $.50
cement bags and sand bags for .50c each

The same store will bundle up their damaged lumber. Maybe it has a crack at the end of the board, maybe it’s warped or damaged by a forklift. The store calls this a Cull Pack and they mark all the material down %50. You can usually get it for another %50 off just by making an offer. The down-side to this is you have to take it all. Sometimes there may be some materials you don’t need that you have to take to get the stuff you do need. 

Cull Pack bundled up for sale
Cull Pack. $372 retail. We got it for $40

Labor barter 

Another great way to get free material is to barter your labor for it. I tore down a horse coral for a lady. In exchange I got to keep the material. It took my wife and I 2 days to get it done, but we were able to build a winter greenhouse with just a portion of the material. I am currently helping demo a 400’ long commercial chicken barn in exchange for materials. These materials will help us add on another 150 sq. Ft. To our cabin. Craigslist is a pretty good place to find these kinds of offerings. 

Conclusion 

The techniques for salvaging materials for building projects can save a bunch of money and will make an impact on waste in consumerism. It will cost less to build something, but it will take longer. By using this information to go to construction sites and construction companies for either free or heavily discounted materials you can significantly reduce your costs for building projects. 

​Read More
DIY Homesteading

8 Things You Can Do Now To Prepare To Live Off-Grid

Preparing to live off the grid is something you can do right now. If you do these 8 steps now you can have a lot of things ready for the day you decide to pull the plug on the grid and kick off your new adventure much more smoothly. 

Some of the links in this post may be affiliate links. This means offgridmaker.com could earn a small commission, at no additional cost to you, on the things you purchase.

 Learn everything you can about living offgrid 

You should digest everything you can on these next subjects. The process of gathering knowledge and developing skills is never over when living off-grid, but starting with the basics now will give you a big head start when you go off-grid.

Learning new things will also get you excited and keep you motivated to achieve your goal. A quick Google search of “off-grid skills” will show that there is a massive amount of information out there and more every day(79,100,000 results at the time of this edit). So read books, listen to podcasts, watch videos and anything else you can do to increase your knowledge base.

Of course, read articles from offgridmaker.com. Sign up for our content notifications in the side menu or at the bottom of this page and I’ll send you a simple email whenever we publish a new article.

Consider water options 

Water, being the #1 component of your survival (excluding oxygen), should be very high on your list of things to prepare for. Does your land have a water source and if so, what will be the delivery mechanism? Will you have to pay to have a well drilled? Will you hand dig a well? Will you harvest rainwater? Maybe you’ll have to begin by hauling water from another source as we did.

There are many solutions to the problem of where your water is going to come from. If you don’t yet have the land you’re going to homestead on then having a well-rounded knowledge of different water solutions will be very helpful when searching for your land and will even impact your purchase decision.  For a more comprehensive look at off-grid water options, check out this article https://offgridmaker.com/2019/05/10/water-options-for-an-off-grid-homestead/

Examine the amount of energy you consume and whittle away at it. 

If you’re living fully immersed in the grid then you likely consume an amount of energy that’s not very sustainable in an off-grid lifestyle. Take an in-depth look at the amount of energy you’re using and start shaving it down at every point you can. It’s the accumulation of small changes that will make a difference.

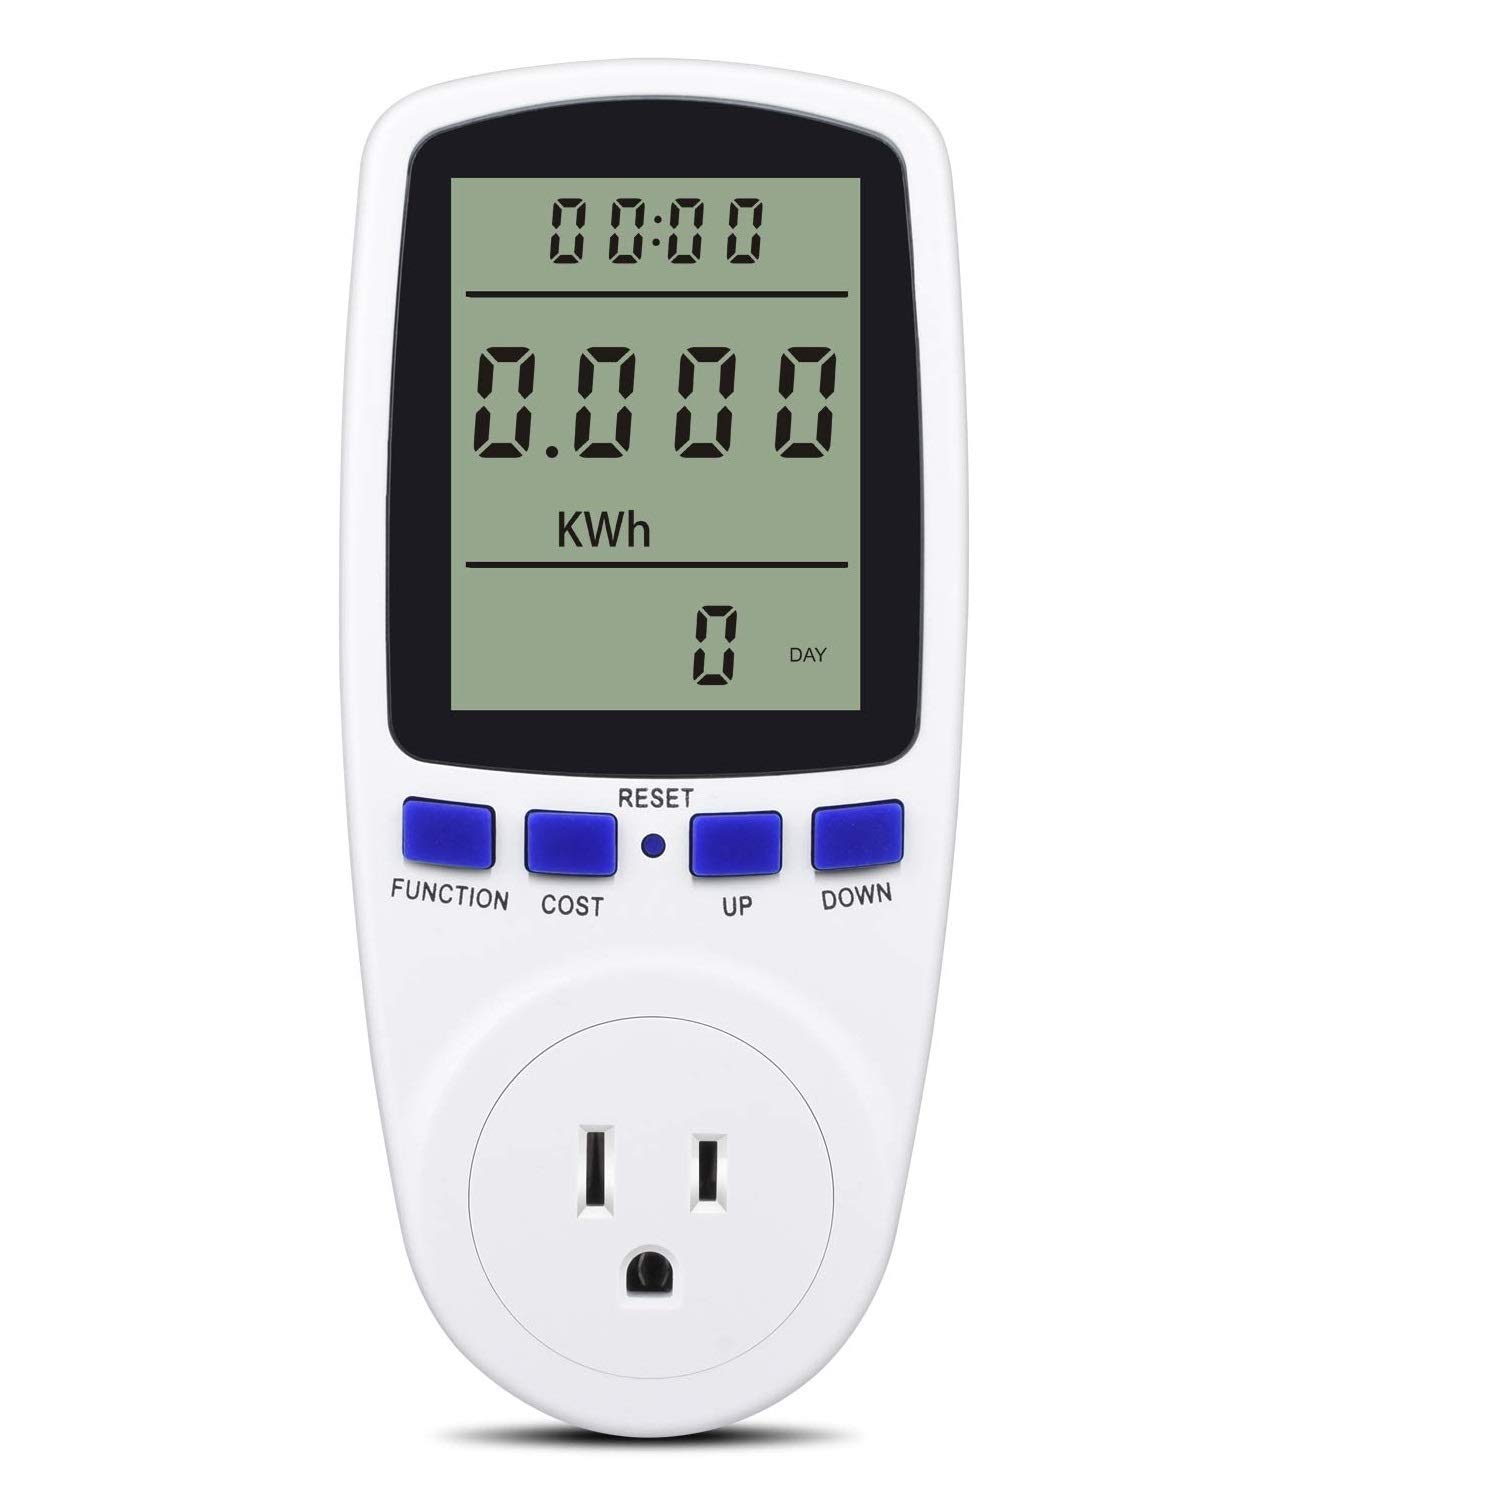
Your monthly electric bill should include the number of kilowatt-hours you’re using every month. Get a plugin kilowatt meter( under $20) and start measuring how much money you’re spending every month running each device in your house. They’re super easy to use, just plug-n-play. Find out how much that microwave is costing to run on a monthly basis. you may decide to stop using it.

The probable truth is that you have no idea how much electricity your electric appliances are using. So, you have no idea how much electricity you would have to produce to go off-grid. Don’t try to just guess what the numbers are. Find out exactly what they are so you can effectively plan your off-grid energy system. Click the image below to find out what the current prices are and get it shipped to your door in a couple of days.

Digital Power Monitor Meter Usage Saving Energy Watt Amp Volt KWh Electricity Analyzer Monitoring Device Equipment System Wall Socket Outlet

There are many home build solar and wind projects that you can do right now. I highly suggest everyone build a solar water heater. You can do it now and on the cheap. There’s also the added benefit of seeing a noticeable difference in your energy bill the first month.

Of course, there is what I call the “Pioneer approach”. This is when you move onto a raw piece of land and basically camp while you build up your homestead. In this way, the amount of energy you consume now isn’t relevant.  

Research all the different options for producing your own energy 

Producing your own energy is one of the 4 key components of living off the grid.  Do your research to find the energy path that works best for you. Are you going to purchase the equipment you need? Will you DIY the projects?

Some of these DIY projects can be built now while you plan your off-grid adventure. Maybe you’ll do a combination of the two. There are literally thousands of resources to learn about solar, wind, hydro, geothermal and many other alternative energy sources. And all of these alternative energy source categories have DIY projects you could be working on before you even own land.

There are many opinions out there about how people should produce and consume energy but no matter what others say there is no right and wrong way to produce your energy, but there is a way that’s best for you. It’s your energy so do it your way. 

Start growing food now. Even if it’s in a container on a balcony 

Producing your own food has so many benefits; from lowering your monthly living expenses to knowing exactly where your food comes from and many more. Knowing you have the ability to feed yourself and your family is very rewarding. You can start learning how to grow food now.

You may not have the space for a garden, but anyone can at least grow some herbs in a window sill. Don’t get discouraged if you fail at growing something a time or two. Everyone has those failures. Just learn some more and try again.

If there’s a community garden near you this is a great place to grow food if you’re limited on space. It’s also a great place to interact with people who know how to grow food and are probably excited to show you their own tips and tricks. 

Start learning self-reliance skills 

Living a lifestyle of self-reliance and living off-grid go hand in hand. You must learn not to be dependent on others for all the skills you need for self-reliance. You don’t have to be an expert in any one skill, but learn as much of the basics as you can.  Below is a shortlist to help you get started if you don’t know where to begin. 

Goto my recommended books page for a list of books that are filled with the kind of knowledge you’ll need. https://offgridmaker.com/recommended-books/

When my wife and I started this journey to self-sufficiency I literally spent hours every night sometimes into the wee hours researching the topics I thought where useful. There’s no doubt in mind that there is no piece of information that can’t be found on the internet. first aid 

  • natural medicines 
  • foraging 
  • basic carpentry 
  • basic small engine mechanics 
  • growing food 
  • raising animals 
  • basic plumbing
  • basic electrical  

Find off-grid groups online to join 

There are so many groups on different social media platforms you can get lost in it all. I suggest a simple 3-part solution. first, find a local group you can physically meet with. This will allow you to build relationships with people living the lifestyle you’re chasing. They will likely let you tour their place to see how they do things, or even let you get your hands dirty with some hands-on stuff.

Next, find an online group with good forums and discussion boards. You will find no shortage of people here ready to discuss and answer questions. Finally, find a blog you like and sign up for it.

I would love for you to try mine for a while to see what you think.

These groups can be a great source of information, inspiration, and encouragement.  You will find most people in this community to be very helpful and talkative about their lifestyle. Very informal mentorships will be easy to form.  

Here’s an article that dives into how important the off-grid community is and several resources to find great places to connect with other like-minded people. https://offgridmaker.com/2020/03/01/the-importance-of-the-off-grid-homestead-community/

Get rid of your debt. 

This last thing may not be so easy or maybe not even possible at first, but the less debt you have when you make the transition to “off-grid” the better things will be. Being able to build an off-grid lifestyle from scratch is going to take a lot of disposable income.

If most of your income is going to debt payments then there’s not much left to buy supplies, materials, and equipment. So many of the reasons people have for choosing to live off-grid stem directly or indirectly from the idea of “leaving the rat race behind”. Going off-grid with a bunch of debt is kind of like leaving the rat race then placing bets on the rats.

Free up as much of your disposable income as possible by getting rid of monthly payments. Take a moment to add up all your monthly payments associated with debt. Will that monthly amount make a difference when it comes to your ability to go off-grid? If the answer is yes then get it paid off as fast as possible. 

Be proactive 

This is obviously not an exhaustive list of the things you could be doing now to get ready to go off-grid. The point of this post is to get you to take some kind of action.  Going off-grid is a journey. It takes many steps. Start taking the steps that you can take now and just keep moving toward the lifestyle you want. Use this comprehensive outline formatted checklist to keep you on track.

​Read More