
Choosing an exterior siding for our cabin has been quite a challenge. The main reason for this is the high cost of quality siding. The affordable siding on the market is really low quality and we just didn’t want to use it for that reason, plus we really wanted a rustic look for our homemade cabin.
Some of the links in this post may be affiliate links. This means offgridmaker.com could earn a small commission, at no additional cost to you, on the things you purchase.

What we have found is perfect. It will last a long time. It’s very cheap (around $0.16 per square foot). We can’t be any happier with the solution we found.
We have found a way to mill out our own log siding out of the leftover slabs from the local sawmill. The only tools used for this is a circular saw, chalk line, tape measure and a saw guide.
The saw mill bundles up the slabs left over from the milling process. These bundles are just small enough to fit in the back of a pickup. Our saw mill charges us $20 for the bundle and from that bundle we’ll be able to make around 120 sq. ft. of log siding. $0.16 per sq. ft. is extremely cheap for real wood siding. The down side is the time and effort is pretty heavy.

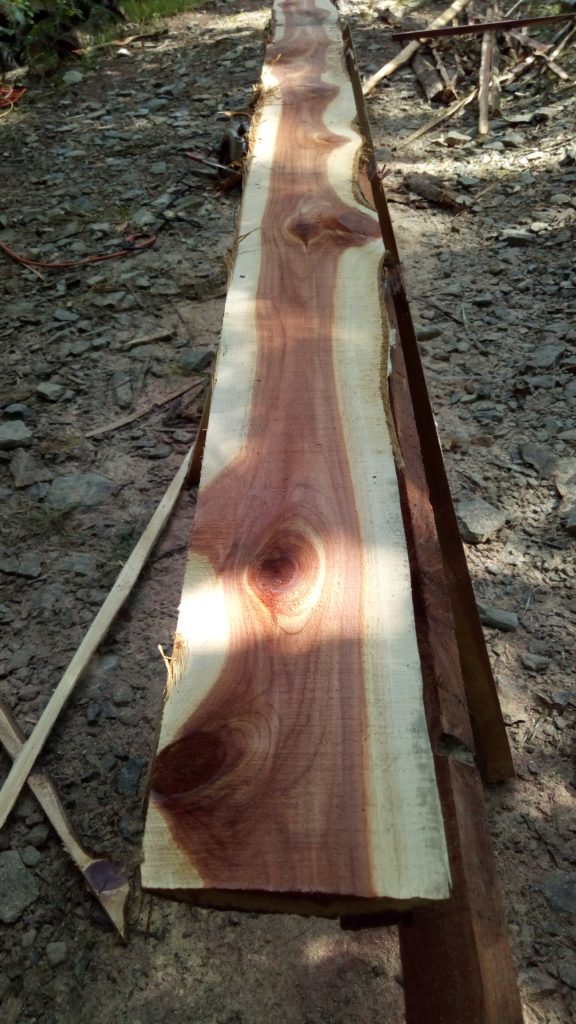
The first thing about siding that’s important is it’s ability to shed water away from the structure and not allow water to migrate from the exterior to the interior. For this reason I cut the edges of the siding to have a slight angle or pitch down and away from the wall.

As it turns out the process for achieving this is much simpler than it seemed to me at first.
The other thing to consider with the use of the sawmill slabs is that they aren’t uniform in any way. They aren’t the same thickness or width. Most of the pieces don’t even have a straight edge. This is where the time and effort come in to play.
Step 1
The first thing I did was separate the slabs from the bundle into different piles.
The first pile were the pieces that I could easily mill because they already had at least one straight edge and the width would make a piece of siding which was 5 1/2” wide.
This was the low hanging fruit. These were the pieces which were easiest to make siding from and would take the least amount of energy and time.
The second pile were the pieces I could still mill into siding, but it would take more time because none of the pieces had a straight edge already. This added an extra step; snapping a chalk line for the first straight edge. This stack also included pieces that would still make siding, but the pieces would be less than 5 ½” wide.
The third pile was material in the bundle that was actually 1 x 6 or 1 x 2 or some sort of dimensionally milled lumber that got culled by the people at the saw mill for one reason or another.
The forth pile included pieces that I couldn’t make siding from but could still be used in constructing other projects where technical specifics wouldn’t be quite as important. Most of that material will end up being a wood shed. “How to build a simple wood shed” coming soon.
The fifth pile was material that really wasn’t good for any type of construction material. I will chop and split all this material up into pieces to burn in my homemade wood fired water heater. I might not be able to build anything with it, but I can turn it into hot water.
Step 2
Now we need to have some saw horses or something to mill all this side on. I found the regular saw horses to be a bit inadequate because the slabs have a tendency to ship and move around doe to their irregular shapes and edges.
I took some scrap lumber and pieces from the sawmill bundle to build some saw horses specific to this use. For now I will include some pictures and may in the future write a separate article on how to build them if I receive enough of a response to do so.

Step 3
We need to set up the saw for our cuts.
First we should set the angle. I set the angle at 10 degrees. This should be just enough angle to allow any water to be shed away from the wall and not allow it to run up and behind the siding. This angle is up to you.
Now we need to set the saw guide.

Chttps://amzn.to/2H1n5P6 lick on the picture above for the Amazon link to this saw guide.
Setting the saw guide makes it possible to cut all the siding to a uniform width, and to make the cut straight and quick.
I found the guides that typically come with the circular saws aren’t long enough to mill a piece of siding wider than about 3”.
Since most of my siding is 5 1/2” wide I had to purchase a saw guide that would be long enough. I found a great universal guide that will work with many different makes and models of circular saws. This way if I get a new saw it’s very likely that the guide I have will still work.
When setting up my guide I decided I would only mill two different widths of siding. This meant I marked two different points on my guide. One at 5 1/2” and the other at 4 1/2”. This allows a quick change from one width to another without the use of a tape measure each time.
Step 4
Now it’s time to start making cuts.
I started with the pieces that already had a straight edge on one side. Set the slab on the saw horses with the straight edge to right side. The first cut will be along this straight edge. You’re just going to eyeball this cut and allow the angled edge of the saw blade to just ride along the straight edge of the slab.
Now move back to make the second cut. This time allow the saw guide to ride along the edge you just cut.

After the second cut I will cut off any bad parts of the ends of the slab that need to be removed. Now you can stack this piece. It’s done. Pretty simple right.
Now for the slabs that don’t have one straight edge already. This just adds one more step. You’ll need to take your chalk line and snap a line near the edge of the slab. Now this line becomes the first cut in this step. That’s all there is to it.
Now find a place to stack your siding neatly so it’s ready when you are.
Summary
So, it took me about 6 hours to mill out 120 sq. ft of cedar log siding. This time includes about 2 hours of figuring and contemplating. Now that I’ve milled quite a bit of siding I should be able to mill out about 100 sq. ft. every 2 hours. With the help of another person I could probably cut that time in half.
Personally, I think this is a great off grid construction technique. It upcycles locale byproduct materials and if you have your own sawmill there will be nearly no additional cost to make the siding.
I would love to hear what you think in the comments.
How would you improve this process?
Would you like a more detailed article about the saw horses?
Have you tried using log slabs for siding?